This guide walks you through setting up a Unity Catalog metastore in Azure Databricks, connecting it securely to an Azure storage account using the Access Connector, validating the setup, and enabling Unity Catalog for your Databricks workspace.
Step 1: Create a Storage Account and Container for Metastore
- Navigate to Azure Portal and create an Azure Data Lake Storage Gen2 account (must be in the same region as your Databricks workspace).
- Add a container for metastore-level storage. For example:
mycontainerinmydatalakestorage. - Note down the ADLS Gen2 URI: text
abfss://mycontainer@mydatalakestorage.dfs.core.windows.net/unity-metastoreThis will be the root path for managed tables and volumes.
Step 2: Create Access Connector (Managed Identity) for Azure Databricks
- In Azure Portal:
- Click “Create a resource” → Search for “Access Connector for Azure Databricks”.
- Click Create.
- Choose Subscription, Resource Group, Region, and enter a connector name (e.g.,
unity-access-connector). - On the Managed Identity tab, select System-assigned managed identity (recommended).
- Click Review + Create.
- Grant Storage Access:
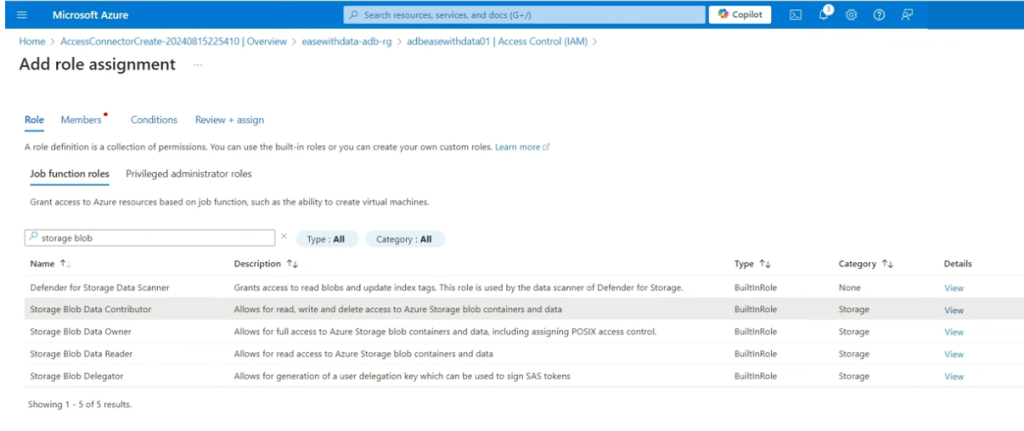
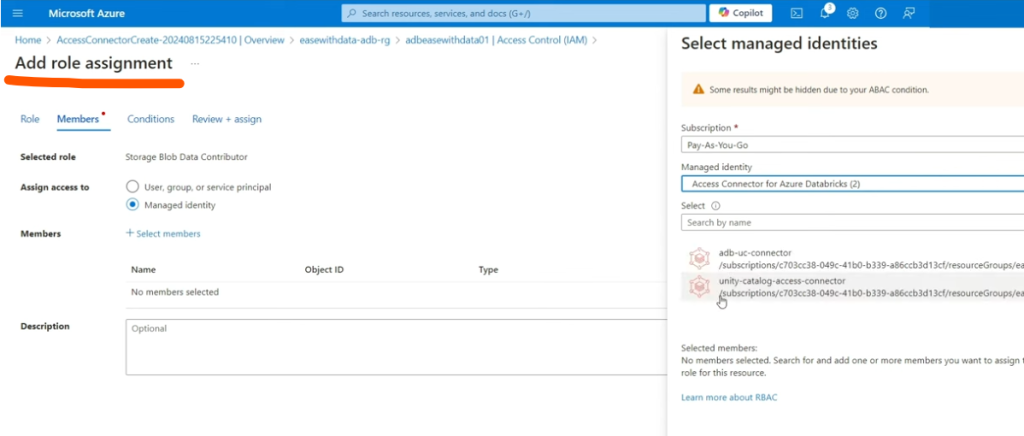
- Assign the managed identity Storage Blob Data Contributor or higher role on the storage account or precise container.
- This enables Databricks to write/read data.
- Note the resource ID: text
/subscriptions/<sub_id>/resourceGroups/<rg>/providers/Microsoft.Databricks/accessConnectors/<name>
Step 3: Create the Metastore in Databricks and Link Storage
- Log in to the Databricks Account Console (), as Account Admin.
- Go to Catalog.
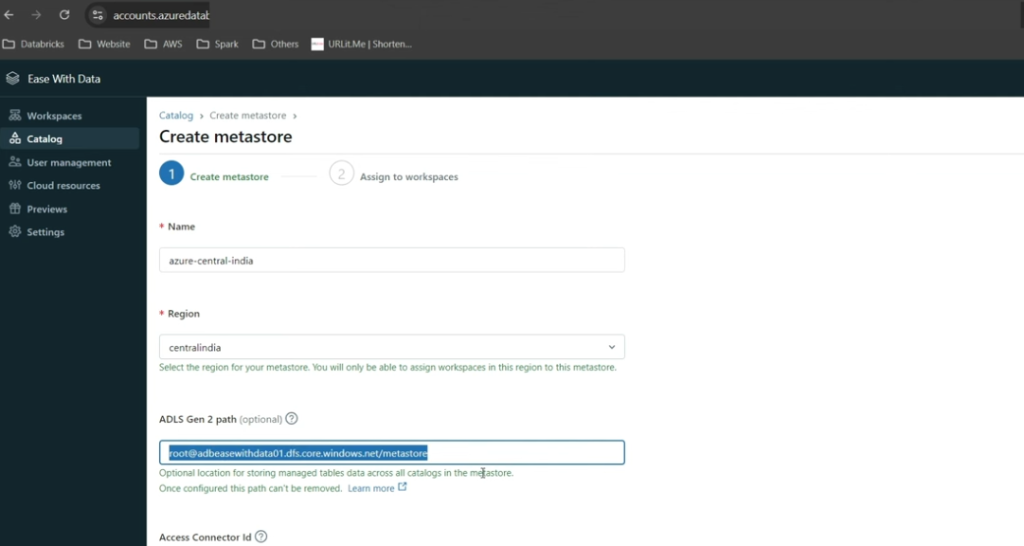
- Click “Create Metastore.”
- Fill the form:
- Name for the metastore
- Region (match storage, workspace)
- ADLS Gen2 path:
mycontainer@mydatalakestorage.dfs.core.windows.net/unity-metastore - Access Connector ID: Paste the resource ID from previous step
- Click “Create.”
Step 4: Link Workspaces to the Metastore & Enable Unity Catalog
- After metastore creation, select workspaces to assign to the metastore.
- Alternatively, return to Account Console → Catalog → Metastore → Workspaces tab → “Assign to workspace”.
- Confirm assignment: The workspace is Unity Catalog enabled.
Step 5: Validation Steps
- Workspace Validation:
- In Databricks Workspace UI, navigate to Data. Confirm you see Unity Catalog concepts (Catalogs, Schemas).
- Storage Validation:
- Access data via Unity Catalog and verify files/folders are created in the designated ADLS Gen2 storage account/container.
- Security Validation:
- Ensure data access controls and audits appear in the Catalog Explorer.
- Metastore Validation:
- Run a simple create table command in Databricks and check physical storage and permission enforcement.
Step 6: Setup Unity Catalog Objects
- Create Catalogs, Schemas, and Tables using SQL in the workspace: sql
CREATE CATALOG my_catalog; CREATE SCHEMA my_catalog.my_schema; CREATE TABLE my_catalog.my_schema.my_table (id INT, name STRING);- Data will be stored in the mapped container, managed by Unity Catalog.
- Create External Locations if needed:
- For additional storage, register external locations for external tables.
Key Notes & Troubleshooting
- Global Admin permissions may be required for setup; SCIM connector recommended for user/group sync.
- You must co-locate storage, connector, metastore, and workspaces in the same region.
- Managed identities via Access Connector are preferred over service principals for security and simplicity.
By following these steps, you will secure, govern, and validate storage and workspace integration with Unity Catalog in Azure Databricks, ready for enterprise-scale Lakehouse governance.
